
Git Start
Note: Most of the content below are based on the book available on Git Documentation: Git book
1. Basic concept
-
Git is a "mini file system"
Git use a special "snapshot" to store changes made to file(see Git book, chapter 1.3). Git knows every change you made to the file by calculating a SHA-1 checksum of files. Git does most things locally so you can work without a network connection. Nearly all operations on git are "adding files", which means you can experiment on anything without worrying if you can get back to the original state. Also, every git clone copies everything on the "master" branch, therefore even the main server where "master" code resides is shot, everything can be recovered.
-
The three states of files inside "Git file system"
One simple diagram:
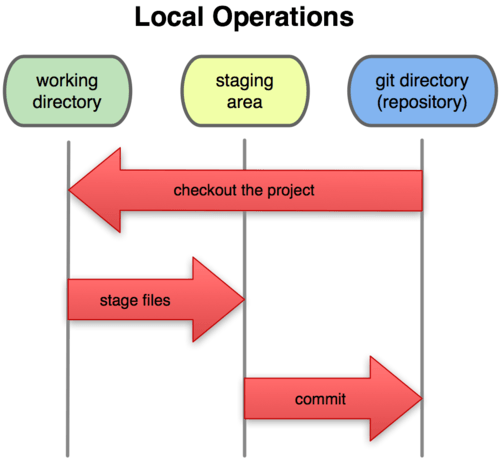
What we do on git?
A General Workflow on Git
- You modify files in your working directory.
- You stage the files, adding snapshots of them to your staging area.
- You do a commit, which takes the files as they are in the staging area and stores that snapshot permanently to your Git directory.
1.1 Install Git
I personally like the git plugin EGit (found on Eclipse Market) for Eclipse since I use Eclipse on Windows. However, I still remcommend a commandline git for exercising.
1.2 Configure Git
Since I don't want to consider too much about git, skip this. Update: At least, one should set his username and email address, which is required by git every time one do git push. I update my default name and email address by:
Code: git config --global user.name "we.taper" git config --global user.email "haha_youCantSee@balala.com"
1.3 Get help
Code:
git help <verb>
git <verb> --help
man git-<verb>     #For Linux manual page
2. Let's Rock
2.1 Get a Git Repository
Basically, we first create a repository somewhere, then others can clone this repository. After cloning or creating, you can add files and then commit to the repository.
Command List
# Create
git init
# Add
git add FileName(support *)
# Commit
git commit -m 'Commit Comment'
# Clone
git clone [url]
# Clone Examples
git clone git://github.com/schacon/grit.git NameOfDirectory # Git transfer protocol
git clone http(s)://github.com/schacon/grit.git # HTTP(s)
git clone user@server:/path.git # SSH
2.2 Record change to Repository
The full Life Cycle of a File:

Note: Unadded file are not tracked, so Git doesn't care about this files.
Staged
When files added (under the control of Git) once modified, it need to be staged to the staging area. Command of stage is the same as add:
git add FileName # "add" is multi-purpose, can add and stage files.
Ignored files.
File .gitignore store patterns of file names which will be ignored by git. Rules are as follows:
- Blank lines or lines starting with # are ignored.
- Standard glob patterns work.
- You can end patterns with a forward slash (/) to specify a directory.
-
You can negate a pattern by starting it with an exclamation point (!).
Glob patterns are like simplified regular expressions that shells use. An astsrisk (*) matches zero or more characters; [abc] matches any character inside the brackets (in this case a, b, or c); a question mark (?) matches a single character; and brackets enclosing characters separated by a hyphen([0-9]) matches any character in the range (in this case 0 through 9) .
See:Unix Man Page and Wikipedia Page
See "What happens?"
To see the general status of "Which file have been modified but unstatged" or "Which file have been staged but uncommited?", use:
git statue
For more detailed information about what actually changed inside files, use diff:
See the difference between Working Directory and Staging Area
git diff
See the difference between Staging and Repository(Commited)
git diff --staged
Now Commit
git commit
# Will open a editor to edit the "Commiting Message"

git commit -a
# Will makes Git automatically stage every file that is already tracked
before doing the commit, letting you skip the git add part
Remove files
Remove from tracked file list:
git rm FileName
Remove from staged directory (file is kept in working directory):
git rm --cached FileName
Note: Deleting files on harddrive doesn't delete them from git's tracked file list.
Instead ther are marked "delete" when you type git status
Moving Files
Note : "Rename" == "Moving to the Same directory"
git mv file_from file_to
Above is equal to:
mv file_from file_to
git rm file_from
git add file_to
2.3 Git Basics - Undoing Things
See : Git book- chapter 2.4
Git Command
-
Change last commit
git commit --amend
This command takes your staging area and uses it for the commit. If you’ve made no changes since your last commit (for instance, you run this command immediately after your previous commit), then your snapshot will look exactly the same and all you’ll change is your commit message. The same commit-message editor fires up, but it already contains the message of your previous commit. You can edit the message the same as always, but it overwrites your previous commit.
-
Unstage File
git reset HEAD <file>...
-
Unmodifyed a File
git checkout -- <file>...
# Note: This cannot be undone since the file hasn't be commited
and therefore not recorded by git.
3 Branching
3.1 What a Branch Is
See : Git book - chapter 3.1
Note : Here I tried to make everything simple but if you wnat a true picture of how branch works in Git, please refer to the original document.
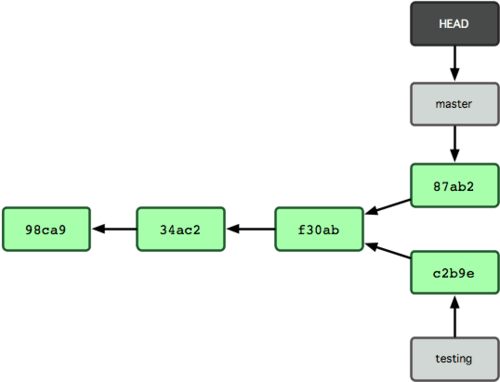
Git take snapshot of every version (commit) of your files. A Branch is just a diverged series of snapshots. Think of a tree which start with a master trunk, then it can stretches out different branches. All this branches are linked with their parent (either a master trunk or a derived branch) with nodes - the mother snapshot they all share. To go back to a older version or another branch, just trace back to the mother snapshot and choose a different route.
Diagram of branches (named in pointer style):
3.2 Basic Branching and Merging
See : Git book - chapter 3.2
Git commands:
-
Create a branch:
git branch NAME
-
Switch to a branch:
git checkout NAME
-
Create and Switch (shortened):
git checkout -b iss53 #equal:git branch iss53 \ git checkout iss53
-
Delete a branch:
git branch -d NAME
# Note: Delete a branch. The branch must be fully merged in its upstream branch, or in HEAD if no upstream was set with --track or --set-upstream.
-
Merge a branch:
git merge NAME
# Note: the "NAME" branch will be merged into current branch you are working on.
Note :
-
Switch (chekout):
Git resets your working directory to look like the snapshot of the commit that the branch you check out points to. It adds, removes, and modifies files automatically to make sure your working copy is what the branch looked like on your last commit to it.
-
Merge:
-
"Fast-forward":
When the commit pointed to by the branch you merged in is directly upstream of the commit you’re on, Git moves the pointer forward. To phrase that another way, when you try to merge one commit with a commit that can be reached by following the first commit’s history, Git simplifies things by moving the pointer forward because there is no divergent work to merge together — this is called a "fast forward".
-
Resolve Conflicts:
If you changed the same part of the same file differently in the two branches you’re merging together, Git won’t be able to merge them cleanly. Git has paused the process while you should resolve the conflict. Now you should see which files are unmerged at any point after a merge conflict running
git statusGit adds standard conflict-resolution markers to the files that have conflicts, so when you open them you can manually resolve those conflicts. Your file contains a section that looks something like this:
<<<<<<< HEAD
contact : email.support@github.com<br>
=======
please contact us at support@github.com<br>
>>>>>>> iss53
This means the version in HEAD (The branch where you are working in, which is what you had checked out when you ran your merge command) is the top part of that block (everything above the
=======), while the version in your iss53 branch looks like everything in the bottom part. In order to resolve the conflict, you have to either choose one side or the other or merge the contents yourself. You resovle conflicts by editing and then staging the file.After you’ve resolved each of these sections in each conflicted file, run
git addto add each file to mark it as resolved. Staging the file marks it as resolved in Git.
If you want to use a graphical tool to resolve these issues, you can run
git mergetool, which fires up an appropriate visual merge tool and walks you through the conflicts. After you exit the merge tool, Git asks you if the merge was successful. If you tell the script that it was, it stages the file to mark it as resolved for you.If you’re happy with that, and you verify that everything that had conflicts has been staged, you can type `git commit` to finalize the merge commit.
-
3.3 Working with remote branch
See :Git book - chapter 3.5 as well as Git book - chapter 2.5
What ? : Remote branches are just branches pointed to remote serves, taking the form of (remote)/(branch) except that you can not move them as fre as the local one. However, remote branches can be modified without noticing, so please synchronize it frequently.
-
See Status
git remote command
It lists the shortnames of each remote handle you’ve specified. If you’ve cloned your repository, you should at least see origin — that is the default name Git gives to the server you cloned from.
git remote -v
It shows you the URL that Git has stored for the shortname to be expanded to.
git remote show [remote-name]
It lists the URL for the remote repository as well as the tracking branch information.
-
Add
git remote add [shortname] [url]
e.g.
git remote add pb git://github.com/paulboone/ticgit.git
Now you can use the string pb on the command line in lieu of the whole URL. -
Fetch
git fetch [remote-name]
e.g.
git fetch pb
Note : The fetch command pulls the data to your local repository — it doesn’t automatically merge it with any of your work or modify what you’re currently working on. You only have anorigin/remotepointer that you can’t modify. You have to merge it manually into your work when you’re ready.To merge this work into your current working branch, you can run
git merge origin/remote. If you want your own remote branch that you can work on, you can base it off your remote branch:git checkout -b remote_in_local origin/remote
-
Push to Upstream
git push [remote-name] [branch-name]
This command works only if you cloned from a server to which you have write access and if nobody has pushed in the meantime. If you and someone else clone at the same time and they push upstream and then you push upstream, your push will rightly be rejected. You’ll have to pull down their work first and incorporate it into yours before you’ll be allowed to push.You can push a local branch into a remote branch that is named differently.
git push [remotename] [localbranch]:[remotebranch]
Like, if you didn’t want it to be called "aaaaa" on the remote, you could instead run:
git push origin aaaaa:awesomebranch
to push your local "aaaaa" branch to the "awesomebranch" branch on the remote project.
-
Rename
git remote rename OLD_NAME NEW_NAME
-
Remove local
git remote rm paul [remote-name]
It removes a reference for the remote branch.
-
Delete Remote Branch
git push [remotename] :[branch]
# Here, you just leave the LocalBranch's name empty!
e.g, If you want to delete your serverfix branch from the server, you run the following:
git push origin :serverfix
Note: A way to remember this command is by recalling the
git push [remotename] [localbranch]:[remotebranch]syntax that we went over a bit earlier. If you leave off the [localbranch] portion, then you’re basically saying, “Take nothing on my side and make it be [remotebranch].” -
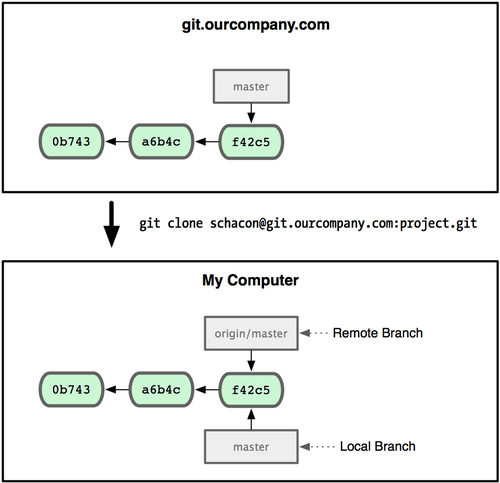
Clone it.
git clone [url]
If you clone from this, Git automatically names it origin for you, pulls down all its data, creates a pointer to where its master branch is, and names it origin/master locally; and you can’t move it. Git also gives you your own master branch starting at the same place as origin’s master branch, so you have something to work from. See:
-
Tracking Branch
See: Git book - 3.5 Tracking Branches
- Using tracking branches can really save you some effort. *
Tracking branches are local branches that have a direct relationship to a remote branch. If you’re on a tracking branch and type git push, Git automatically knows which server and branch to push to. Also, running git pull while on one of these branches fetechs all remote references and automatically merges in the corresponding remote branch.
Check out:
git chekcout --track RemoteName/BranchName
# Or, below gives it a new name
git checkout -b NewName RemoteName/BranchName
3.4 Rebasing
In effect, rebasing is the same as merge, and the whole process is very alike. You have to rebase --> solve confilicts --> git add to mark solved --> continue rebase. However, rebase eliminate the number of different branches and thus makes the history of coding more clear and concise.
Commands:
git rebase branchToBeBased # Here may exists conflicts.
git rebase --continue # Contine after solving the conflicts.
git rebase --skip # Skip the patch.
git rebase --abort # Give up this rebasing.
More detailed information: Git Manual - Rebase.
4. Github
4.1 Add your local file to Github
First, you should setting up an account in Github. It's rather easy.
Then, if you want to push a local repository to Github. First create an empty one on Github and then add it to your local git remote branch by:
git remote AName UrlToRemoteRepo
Then push:
git push AName LocalBranch
4.2 Fork others' and contribute
To contribute to other's project, you should: Fork his project by git checkout or Fork button on Github --> Push your modifications to your own Github --> Make a Pull Request on Github to Contribute.
There is a green button on your repo's page called Compare, review, create a pull request. You just need to click it and adjust something, fill some commit message. Then Github will take care of the pull request on its serve.
4.3 Access Github by SSH
See: Generate SSH Keys - Github Doc
Git support SSH link. By this, Git can control the access ability. When you checkout something on Github by simple url, you would not have write access to the remote branch. If you try to push, git will ask for your username and password on Github.
In order to have write access, you would need a personal SSH key. SSH key helps to identify users without a user account and password combination.
To generate ssh key, you should have some ssh client in your computer. If you install Git from the official source, it will install a Git Bash, where it provide a ssh-keygen to generate ssh keys.
ssh-keygen -t rsa -C "YourEmail@Address.com"
This will create a ssh key of your own and ask you for where to store and a passphrase.
Something about Passphrase:
Why do passphrases matter?:
From: Generate SSH Keys - Github Doc
Passwords aren't very secure. If you use one that's easy to remember, it's easier to guess or brute-force (try many options until one works). If you use one that's random, it's hard to remember, and thus you're more inclined to write it down. Both of these are Very Bad Things™.
This is why you're using SSH keys. But, using a key without a passphrase is basically the same as writing down that random password. Anyone who gains access to your computer has gained access to every system you use that key with. This is also a Very Bad Thing™. The solution is to add a passphrase to the SSH key, for an extra layer of security.
But I don't want to enter a long passphrase every time I use the key!
Neither do we! Thankfully, there's a nifty little tool called ssh-agent that can securely save your passphrase so you don't have to re-enter it. If you're on OSX Leopard or later, your keys can be saved in the system's keychain, which makes your life even easier. Unfortunately, it takes a little work to get it up and running on Windows.
Then, copy the public key where you store you key and paste it into you Github's "Account Settings" --> "SSH Keys". Don't confuse the public with the private key. Public key usually stores in file name xxx.pub while private is usually the same name but without a file extension .pub
Next, clone the repo with SSH url (or Git URL):
git clone git@github.com:we-taper/vim-pathogen.git
Then, you will have write access to this repo with passphrase of your SSH key.
4.3 Collaborate directly by Github Account
You can also add other Github Account to your collaborate of this repo. This is much more convenient than the above SSH method.
On Github, there is a plus button on right-top corner where you can add Collaborators to this repo. Clicked and have fun!
To Be Conitnued